July 2015 - History Gal

A Quick Tip: ThingLink


Have you ever wanted to make an image interactive? Then, you'll love ThingLink!

Before you can get started, you'll need to sign up for an account. Once your account is set up, click on Create and upload a picture you'd like to make interactive. 

The site is very user friendly and it took me just a few minutes to figure out how to create my first interactive photograph!

Here it is:
I know this site will come in very handy when I'm creating lessons. I also think students would like to create interactive images, too.

How would you use this site?

Happy Creating!

If you enjoyed this post, you should sign up for my monthly newsletter for more great ideas, tips, and exclusive freebies!


0

PowerPoint Hacks: Slide Sorter


Ever wish there was an easy way to move PowerPoint slides around? There is!
The Musings of  History Gal

The Musings of a History Gal
*These screen images are from PowerPoint 2010. If you have a different version, your screen will look different, but the steps should be similar. 

 If you enjoyed this post, you should sign up for my monthly newsletter for more great ideas, tips, and exclusive freebies!
0

A Quick Tip: ViewPure


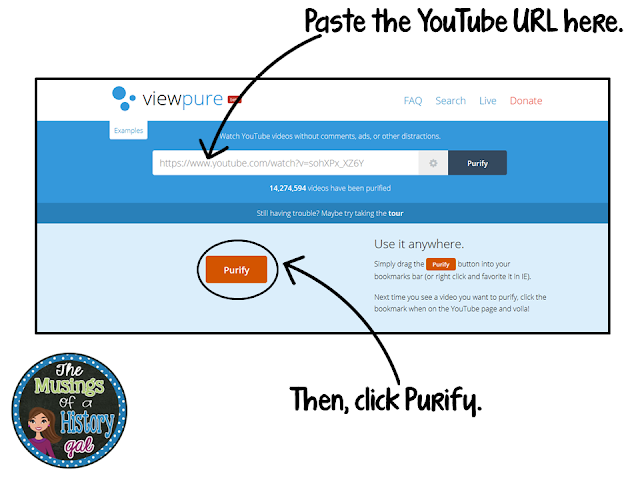
Have you ever wished you could have your students watch a YouTube video without having to worry about vulgar comments, distracting suggested video links, and even commercials? If so, you'll love ViewPure!

To use ViewPure, first copy the YouTube URL of the video you want to purify. For my example, I'll use the YouTube video - Mesopotamia: Crash Course World History #3 at https://www.youtube.com/watch?v=sohXPx_XZ6Y.


Then, go to ViewPure at http://viewpure.com/ and paste the YouTube URL into the appropriate spot. Click Purify.


The Musings of a History Gal
You'll get a new URL like this one - http://viewpure.com/sohXPx_XZ6Y - which opens to a commercial free video with no comments and no suggested videos!

If you enjoyed this post, you should sign up for my monthly newsletter for more great ideas, tips, and exclusive freebies!

0

My Favorite PowerPoint Hacks


During the last year, I've become a huge fan of PowerPoint. Maneuvering text and images is a breeze in PowerPoint. I use it for just about all of the documents and images I create on my computer. Since I've been spending so much time creating in PowerPoint, I've discovered lots of fantastic features!

Here are some of my favorite PowerPoint Hacks (click the link to learn more about each hack):
1. While I am creating a resource in PowerPoint, I create a template that I can use over and over again with Duplicating Slides.
2. While I am working on a new resource in PowerPoint, I can use a slide I created in a different PowerPoint by Reusing a Slide.
3. I use the Crop to Shape function to create shapes to use my presentations and resources.
4. I  Use the Shape Function to Make Borders
5. I use the Slide Sorter to reorganize my slides.
6. I use the Utilizing the 'Save As' Function to save my PowerPoint as PDFs and videos.


If you enjoyed this post, you should sign up for my monthly newsletter for more great ideas, tips, and exclusive freebies for teaching social studies!
4

PowerPoint Hack: Make Borders

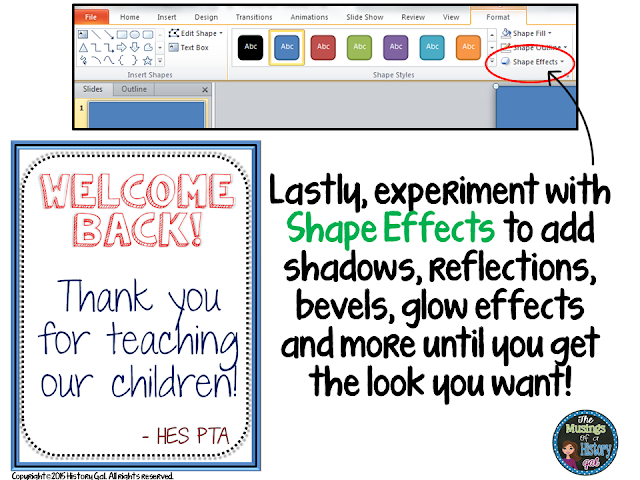
It's easy to make simple borders using the shape function in PowerPoint. Check out PowerPoint Hack #3 to learn how you can reuse the borders without having to cut and paste!
Here's how to create your borders: 
*These screen images are from PowerPoint 2010. If you have a different version, your screen will look different, but the steps should be similar.

The Musings of a History Gal

The Musings of a History Gal


The Musings of a History Gal


The Musings of a History Gal

The Musings of a History Gal

Click here for more PowerPoint hacks!

0

Chapter 5: Differentiation and the Brain

 I've joined up with Ellie from Middle School Math Moments, Math Giraffe, Leah Cleary, and Brittany from the Colorado Classroom to read Differentiation and the Brain by David A. Sousa and Carol Ann Tomlinson.

Click on these links to read about the rest of the book:
Introduction
Chapter 1: The Nonnegotiables of Effective Differentiation
Chapter 2: Mindset, Learning Environment, and Differentiation
Chapter 3: Curriculum and Differentiation
Chapter 4: Classroom Assessment and Differentiation
Chapter 6: Differentiating in Response to Student Interest
Chapter 7: Understanding Student Learning Profiles
Chapter 8: Managing a Differentiated Classroom

This chapter begins by reminding us that student readiness "changes from topic to topic and skill to skill" and that teachers need to be aware of this fluidity.

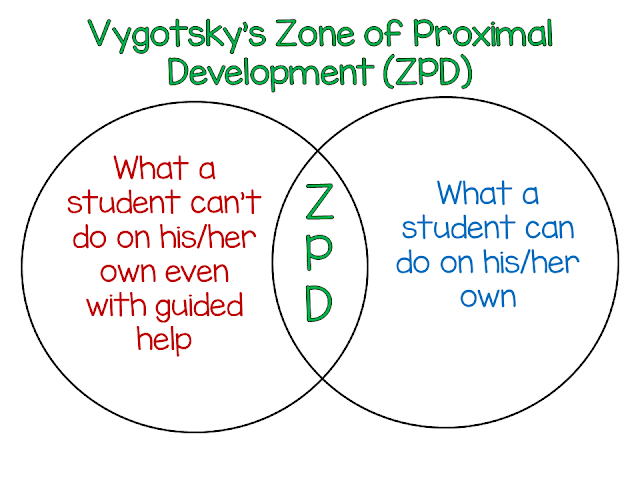
To further illustrate this point, the authors bring in Lev Vygotsky's Zone of Professional Development (ZPD).
The Musings of a History Gal
 According to Vygotksy, the optimal learning zone is a task that is a little beyond the student's grasp, but with scaffolding (i.e. help from a teacher, peers, or other experts), they are able to accomplish. The zone is not static, it moves as students grow as learners.

Vygotsky's Zone of Proximal Development may seem dated, but neuroscience supports his theory.  New tasks that students feel they can achieve are more likely to be encoded and remembered versus tasks that are too easy or too difficult.

How do you know a student's zone? Sousa and Tomlinson give a few suggestions:
- observe students while they work
- examine students' preassessments and other assessments
- pay attention during class discussions
- observe how students work independently
- learn students' reading and vocabulary levels

Necessary Classroom Elements for Readiness Differentiation
1. A caring and supportive learning environment
2.  When planning a unit, teachers should clearly delineate what students should know (K), what students should understand (U) and what students should be able to do (D). These KUDs can vary for different students depending on their readiness and their ZPD. 
3. Assessment data
4. Classroom rules and procedures for flexible classroom routines
5. Variety of types of instruction where whole group instruction is done on a limited basis

Some Guidelines:
*Identify the KUDs for each unit and state them in a way that students will understand.
*Develop preassessments that align the unit's KUDs and administer the preassessments before you start the unit so you will  have time to plan differentiation.
The Musings of a History Gal*Do a preassessment of students' reading, writing, and listening readiness at the beginning of the school year and at the mid-point. This does not have to be a formal test, but readiness in these areas can be easily assessed by having students write a set of directions, having them read a passage and answer questions, and having them listen to you read a passage and then answer questions.
*Use the preassessments to determine what you need to do to support and challenge your students.
*Troubleshoot areas of a unit that you know students typically have difficulty with and supplement these areas.
*Be sure that students have reading materials that match their readiness levels.
*Plan for flexible groupings. In other words, make groups fluid and continually changing so the groups don't become the eagles and the dodos.
*Check on student learning throughout the unit with formal and informal assessments and seek input from the individual students about their proficiency.
*Use activities that align with the unit's KUDs.
*It's NOT giving some students more work and others less.

Learning Contracts and Tiering
Once you've administered preassessments and know where your students are, you can differentiate content, activities, and products based on student readiness.
One helpful tool is learning contracts.
Some helpful guideline about learning contracts from Sousa and Tomlinson:
The Musings of a History Gal*teachers should use the assessment data to guide the items included in the contract
*the items in the contract should reflect the unit KUDs, focus on an area of student need, and can also connect to a student's strengths
*students' contracts should look alike in format and number of tasks to be completed, but the actual items on the contacts will differ
*the contract can include all required items or a variety of required and student choice options
*let students have freedom in selecting the order of completion
*when students complete a task, the work should be checked by the teacher for accuracy and understanding before the student moves on to the next task

Another helpful tool is tiering.
Some helpful guidelines about tiering from Sousa and Tomlinson:
*the tasks should all focus on the essential knowledge, understanding and/or skills
*the tasks should all require thought or reasoning
*the tasks should all be interesting or inviting

You can sign up here to receive a helpful free download of Sousa and Tomlinson's Checklist for Differentiation Instruction Based on Student Readiness and Differentiating Content, Process, and Product Based on Student Readiness.

As you can tell, there's a wealth of information in this chapter! 

Click here to read my Top 5 Takeaways from Chapter 5.

  If you enjoyed this post, you should sign up for my monthly newsletter for more great ideas, tips, and exclusive freebies!

6

5 Takeaways from Chaper 5: Differentiating in Response to Student Readiness

The Musings of a History Gal
I have to admit, while this chapter is full of great information and ideas, it is a little overwhelming to think of its complete implementation. As a teacher who taught on average 180 students a year on an A/B rotating block schedule, the sheer magnitude of differentiating for student readiness for 180 students makes my head pound.

There are several places in the chapter where I wrote comments in the margins like "how do teachers have time to do this?!" The idea of having to look through 180 preassessments a few days before a new unit and then use that data to create ways to differentiate the unit had me wondering if the authors had really even taught in a high school. However, the more I read, the more intrigued I became and here are 5 things I plan on doing.

The Musings of a History Gal5 Takeaways from This Chapter:


1. At the beginning of the year, assess students' readiness in reading, writing, and listening by having them (1) write out a set of directions, (2) read a passage and answer questions, (3) listen to me read a passage and then answer questions. This way I can identify students who struggle and will need help.

2. Create tiered reading assignments that cover the same essential content, but in a way that struggling students will understand and non-struggling students can be challenged.

3. Redefine preassessment. In my mind, a preassessment is a test. But, it doesn't have to be! It could be as simple as having students move to a certain corner of the room based on what they know about a topic we will be covering. For example:

The Musings of a History Gal

4. Create more checkpoints during a unit to make sure students are understanding what we are covering.

5. Remember that students' readiness is not static - it changes from topic to topic and skill to skill.

Did you miss my summary of Chapter 5? Read it here.

  If you enjoyed this post, you should sign up for my monthly newsletter for more great ideas, tips, and exclusive freebies!

2
Back to Top